


Improving WordPress accessibility is essential to ensure that websites built on the platform are inclusive and can be accessed by all users, regardless of disabilities or impairments. Here are some tips to enhance WordPress accessibility.
Use an Accessible WordPress Theme
- Choose a WordPress theme that is designed with accessibility in mind.
- Look for themes that follow WCAG (Web Content Accessibility Guidelines) standards and have proper semantic markup.
Top Accessibility WordPress Themes
Source https://www.competethemes.com/blog/wordpress-accessible-themes/
Provide Alternative Text for Images
Add descriptive alt text to images, allowing users with visual impairments to understand the content of the images through screen readers, That’s also very important for SEO.
How to Add Alternative Text In WordPress
- When adding or editing an image in the WordPress media library or within a post/page editor, look for the “Alternative Text” or “Alt Text” field.
- Write a brief and descriptive alt text that conveys the purpose and content of the image. Focus on providing relevant information that is helpful for users who cannot see the image.
- Avoid using redundant or generic phrases like “image of” or “picture of.” Instead, describe the image in a way that provides context and meaning.
- If the image is purely decorative and does not convey any meaningful information, you can use an empty alt attribute (alt=””) or add a descriptive aria-hidden=”true” attribute to indicate to screen readers that the image should be ignored.
Remember to consistently add alt text to all relevant images on your WordPress website to ensure a better user experience for individuals who rely on screen readers or who have visual impairments.
Use Headings Properly
Structure your content using headings (h1, h2, h3, etc.) in a logical hierarchy, Headings help screen readers and users navigate and understand the content more easily.
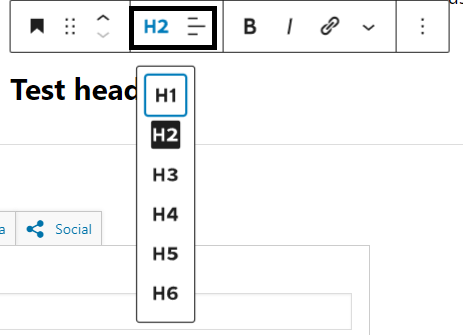
How to Add Headings in WordPress Editor
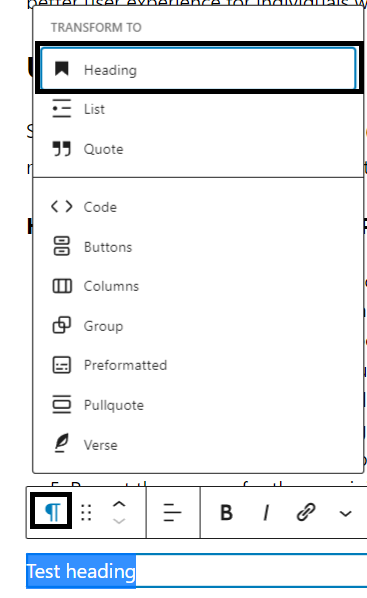
- Start by creating a new blog post or editing an existing one in the WordPress editor.
- Select the title of your blog post and choose the “Heading 1” option from the “Paragraph” dropdown menu in the editor’s toolbar. This sets the main title of your post as the primary heading.
- Now, let’s say you want to introduce the first trend with a subheading. Type the subheading text (e.g., “1. Minimalistic Design”) and select it. From the “Paragraph” dropdown menu, choose “Heading 2” to designate it as a subheading.
- Write the corresponding paragraph about minimalistic design below the subheading.
- Repeat the process for the remaining trends, using “Heading 2” for subheadings and “Paragraph” for the text.
Ensure Color Contrast
Use sufficient color contrast between text and background elements to make content readable for users with visual impairments.
Aim for a contrast ratio of at least 4.5:1 for normal text and 3:1 for large text.
How to Test Color Contrast?
You can test color contrast using Chrome extensions, you can utilize various accessibility testing tools that provide color contrast analysis. Here’s an example using the “DigitalA11Y Color Contrast Checker” extension:
- Install the “DigitalA11Y Color Contrast Checker” extension from the Chrome Web Store if you haven’t already.
- Once installed, click on the “DigitalA11Y Color Contrast Checker” icon in your Chrome toolbar to activate the extension.
- Navigate to the webpage you want to test for color contrast.
- Click on the extension icon, and a color picker tool will appear on your screen.
- Move your cursor over an element on the webpage to sample its color and contrast.
- The color picker tool will display the sampled color, its contrast ratio with the background, and whether it meets the WCAG recommended contrast ratios.
- Adjust the colors if needed and check the contrast ratio in real-time.
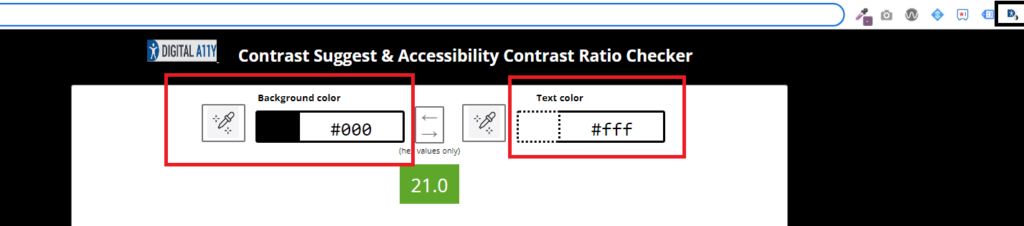
The “DigitalA11Y Color Contrast Checker” extension provides a user-friendly interface for testing color contrast directly within the browser. It allows you to sample colors from any element on a webpage and assess their contrast ratios, helping you ensure compliance with accessibility standards.
Provide Captions and Transcripts for Multimedia
Providing captions and transcripts for multimedia content is essential for making it accessible to individuals with hearing impairments or those who prefer or require textual alternatives. Here’s how you can provide captions and transcripts for multimedia in WordPress:
- Captions for Videos:
- Upload your video to a video hosting platform that supports captions, such as YouTube or Vimeo.
- Enable captions or subtitles for your video during the upload or editing process on the hosting platform.
- Once the captions are available, you can embed the video on your WordPress site using the platform’s embed code or a WordPress plugin that supports captioned videos.
- Audio Transcripts:
- Create a transcript document that includes the text of the audio content in a readable format.
- You can either display the full transcript on the same page as the audio or provide a link to a separate page or downloadable document with the transcript.
- Add a clear indication near the audio player, such as “Transcript available,” to inform users about the transcript’s availability.
- Captions for Live Streams:
- If you are hosting live streams on your WordPress site, consider using live captioning services or platforms that provide real-time captioning functionality.
- Ensure that the live captioning feature is enabled and visible during the live stream broadcast.
- Inform your viewers about the availability of captions for live streams through announcements or visual indicators.
By providing captions for videos and transcripts for audio content, you make your multimedia more accessible and inclusive. This enables individuals who are deaf or hard of hearing to access the content effectively and ensures that all users can engage with your multimedia content, regardless of their auditory abilities.
Keyboard Accessibility
Keyboard accessibility is crucial for ensuring that all users can navigate and interact with your website using only a keyboard, without relying on a mouse or other pointing devices. Here are some tips to enhance keyboard accessibility in WordPress:
- Test Keyboard Navigation:
- Use the Tab key to navigate through your website’s pages, links, and interactive elements.
- Ensure that all interactive elements, such as buttons, form fields, and navigation menus, are reachable and operable via the keyboard.
- Verify that the focus indicator (often a visible outline or highlight) is clearly visible, indicating the currently focused element.
- Enable Keyboard Accessible Menus:
- If your WordPress theme includes dropdown menus or mega menus, ensure they are accessible via the keyboard.
- Implement keyboard shortcuts, such as using the arrow keys to navigate through menu items and the Enter key to activate them.
- Include visible focus indicators on menu items and submenus.
- Skip to Content Link:
- Include a “Skip to Content” link at the top of your web pages, allowing keyboard users to bypass repetitive navigation and jump directly to the main content.
- Ensure the “Skip to Content” link is easily visible and accessible at the start of the tab order.
- Manage Focus Traps:
- Avoid trapping keyboard users in specific areas or modal windows without a clear way to exit or navigate back to the main content.
- Implement proper focus management to allow users to move in and out of modal windows or pop-ups using the keyboard.
- Form Accessibility:
- Ensure all form fields, checkboxes, radio buttons, and dropdowns are accessible via the keyboard.
- Implement proper focus styling for form elements, making it clear which element has focus.
- Provide clear instructions and visible labels for form fields.
- Test and Validate:
- Regularly test your website’s keyboard accessibility using only the keyboard for navigation and interaction.
- Use tools like the keyboard testing feature in accessibility evaluation tools or browser extensions to validate keyboard accessibility.
By implementing these practices, you improve the usability and accessibility of your WordPress website for individuals who rely on keyboard navigation. It ensures that users can access and interact with your content effectively, regardless of their ability to use a mouse or other pointing devices.
Use ARIA (Accessible Rich Internet Applications) Attributes
Incorporate ARIA attributes to enhance the accessibility of interactive elements, such as menus, buttons, and form fields.
ARIA attributes provide additional information to assistive technologies about the purpose and behavior of these elements.
Test and Validate
Regularly test the website for accessibility using tools like the WAVE Web Accessibility Evaluation Tool or the Web Developer browser extension.
Perform manual testing and engage users with disabilities for feedback and usability testing.
Test and Validate Accessibility Using WAVE Chrome Extension
To test and validate the accessibility of your WordPress website, you can use the WAVE extension. Here’s how to perform accessibility testing with the WAVE extension:
- Install the WAVE extension for your Chrome or Firefox browser from the WebAIM website (https://wave.webaim.org/extension/).
- Once installed, visit your WordPress website in the browser.
- Click on the WAVE extension icon in your browser toolbar to activate it.
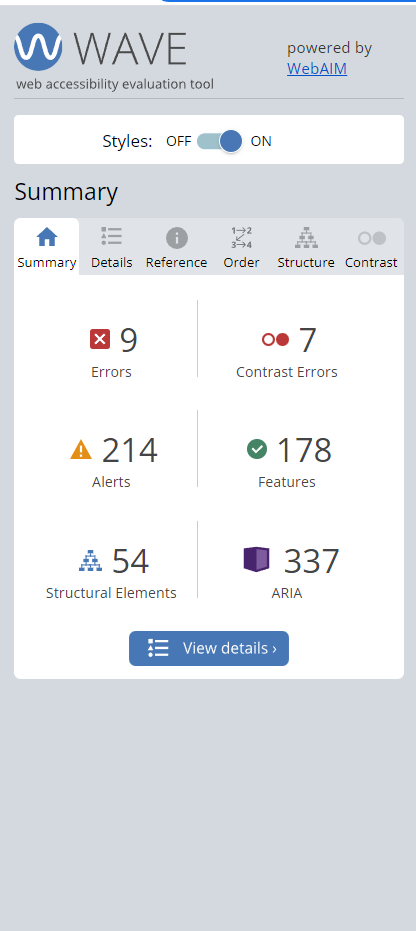
- The WAVE toolbar will appear, overlaying your website. It provides a summary of accessibility errors, alerts, and other information.
- Review the WAVE toolbar to identify potential accessibility issues on your web pages. The toolbar displays icons and color-coded indicators to highlight different types of accessibility problems.
- Click on the icons or indicators in the WAVE toolbar to get more details about specific issues.
- WAVE provides a detailed report of accessibility errors, warnings, and alerts. Use this report to understand the specific issues and their recommended solutions.
- Navigate through different pages and interactive elements of your WordPress website to test for accessibility across your entire site.
- Make necessary changes and fixes to address the identified accessibility issues based on the recommendations provided by WAVE.
- Re-run the WAVE extension periodically during the development process and after making changes to ensure ongoing accessibility compliance.
Keep Up with Accessibility Standards
To keep up with accessibility standards, it’s important to stay informed about the latest developments and best practices in web accessibility. Here are some suggestions:
- Follow Accessibility Guidelines:
- Keep track of the latest versions of web accessibility guidelines, such as the Web Content Accessibility Guidelines (WCAG) published by the World Wide Web Consortium (W3C).
- Visit the W3C’s website (https://www.w3.org/WAI/standards-guidelines/) to access the WCAG and related resources.
- Subscribe to Accessibility Newsletters and Blogs:
- Sign up for newsletters and blogs that focus on web accessibility.
- Subscribe to reputable sources like WebAIM (https://webaim.org/blog/), A11y Weekly (https://a11yweekly.com/), and the W3C’s WAI Interest Group mailing list (https://www.w3.org/WAI/IG/).
- Join Accessibility Communities:
- Participate in online forums and communities centered around web accessibility.
- Engage in discussions, ask questions, and learn from experts in the field.
- The Web Accessibility Slack Community (https://web-a11y.herokuapp.com/) is a popular platform for connecting with accessibility professionals.
By actively engaging with the web accessibility community, following relevant resources, and staying informed about accessibility guidelines and best practices, you can ensure that your WordPress website remains compliant with the latest accessibility standards.
No Comments